 付款。
付款。(在家觀看 = 0%,在校觀看 = 100%)
100% 在校觀看日期及時間:
自由選擇,點選以下地區觀看辦公時間及位置

課時: 18 小時
享用時期: 9 星期。進度由您控制,可快可慢。
課堂錄影導師:Norman
在校免費試睇:首 1 小時,請致電以上地點與本中心職員預約。
本課程提供在校免費重睇及導師解答服務。
(在家觀看 = 100%,在校觀看 = 0%)
100% 在家觀看日期及時間:
每天 24 小時全天候不限次數地觀看
課時: 18 小時
享用時期: 9 星期。進度由您控制,可快可慢。
課堂錄影導師:Norman
在校免費試睇:首 1 小時,請致電以上地點與本中心職員預約。
本課程提供導師解答服務。
當你初步學習了 Docker 的功能後,通過進一步了解 Docker 背後的技術,可以令你更易掌握關於 Docker 的應用技巧。本課程除了探討一些 Docker 背後技術之外,也會介紹管理多過一個運行 Docker 的主機時,可以應用的技術。 本課程會涉及的技術包括:
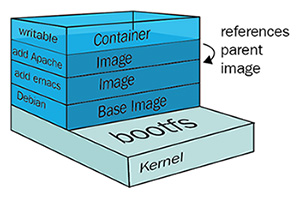
- 關於檔案系統方面,Docker 如何用 “layers” 去建立 container 及 image 的檔案系統。這樣的檔案系統有甚麼好處,以至應用時如果運用這些好處。
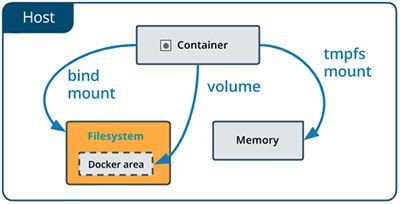
- 關於掛載檔案方面,Bind Mount 及 Volume 的分別。何時應運用它們及如何選擇那一個去應用。另外也會簡單介紹如 Docker 開啟了運用 SELinux 時,對掛載檔案有甚麼影響。
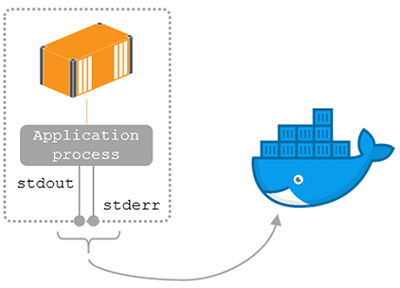
- 關於記錄 (logging) 方面,Docker 如何取得每一個 Container 的記錄資料。記錄檔存放在那裏,有甚麼格式可選擇以及如何避免累積太多記錄而佔用太多儲存空間。
- 關於網絡方面,Docker 如何為 Container 建立內部虛擬網絡。如何客制你需要的網絡環境 (如指定 IP address, DNS settings …. 等等) 去提供給 Containers 使用。另外也會簡單介紹當 Docker 主機內建防火牆時,有那些虛擬網絡會受影響及如何解決。
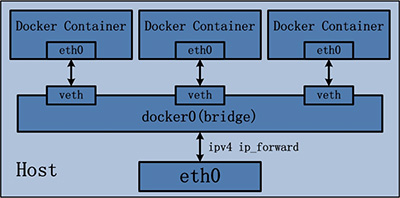
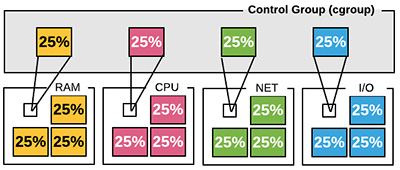
- 關於資源管理方面,Docker 如何管理每一個 Container 的可用資源 (如 CPU, 記憶體 … 等等)。如何可以設定這些限制。
- 關於建立 Container 方面,當在互聯網上找不到你需要在 Container 運行的程序 (Process) 鏡像檔 (image) 時,如何自己客制一個鏡像檔。課程中的例子會示範由最初人手建立 Container 用作測試,直至測試成功後,使用 Docker Compose 去自動化建立 Container 以及有需要時作出更改的整個過程。另外,如因特別需要而要在一個 Container 中執行多於一個程序時,這個 Container 可以如何建立。以及,如何可以令其中一個因意外退出了的程序可以自動重啟。

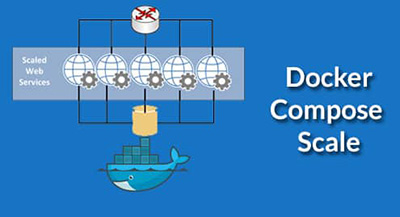
- 關於建立多個執行相同程序的 Containers 方面,如何可以簡單地指令 Docker 去增加或減少這些 Container 的數量。課程中會以網頁伺服器的 Container 作例子,同時也會示範如何建立一個簡單的網頁負載平衡器 (Load Balancer) 的 container 去自動分配網頁要求 (web request) 至正在運行中的 Containers。無論增加或減少網頁伺服器,container 也不用重新設定運行中的負載平衡器。
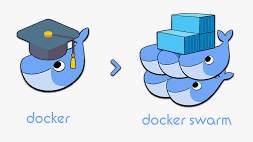
- 關於管理多於一部運行 Docker 的主機方面,如何可以在一部 Docker 主機通過執行 “docker” 指令,去管理自己或任何一部你指定的 Docker 主機。最後,本課程也會簡單介紹 Docker Swarm (群) 的功能,這個功能特別之處是可以用單一個指令去令多部 Docker 主機同時建立或管理執行相同程序的 Containers。
因為本課程涉及防火牆和 SELinux,因此會使用預設已啟動防火牆和 SELinux的 CentOS 上運行的 Docker作為示範例子。
| 課程名稱: |
進階 Linux Docker 軟體容器 (Container) 課程 - 簡稱:Advanced Linux Docker Training Course |
| 課程時數: | 18 小時 (共 6 堂) |
| 適合人士: | 有學習或使用過 Docker Container 而且有興趣對此技術及應用作進一步認識的人士 |
| 授課語言: | 以廣東話為主,輔以英語 |
| 課程筆記: | 本中心導師親自編寫英文為主筆記,而部份英文字附有中文對照。 |
|
課程名稱:進階 Linux Docker 軟體容器 (Container) 課程 - 簡稱:Advanced Linux Docker Training Course |
1. Image and Container Layers
1.1 Overview
1.2 Layers in a Container
1.2.1 Basic Mechanism for the R/W Layer
1.2.2 Examining the Layers in a Container
1.2.3 Exercise for Examining the Working of Container’s Layers
1.2.4 Notes about Accessing R/W Layer in a Container
1.3 Layers in an Image
1.3.1 Basic Mechanism
1.3.2 Exercise for Examining Images Layers
1.3.3 Image Layers when Building with Dockerfile
1.3.4 Exercise for Examining Build Cache
1.3.5 Exercise for Clearing / Disabling Build Cache
1.3.6 Exercise for Multi-Stage Builds
2. Ways for Providing Storage Space to a Container
2.1 Overview
2.2 Pros and Cons for Using Layers
2.3 Using Volumes
2.3.1 Mechanism of Volumes
2.3.2 Exercise for Using Volumes
2.3.3 Pros and Cons for Using Volumes
2.4 Using Bind Mount
2.4.1 Mechanism of Bind Mount
2.4.2 Exercise for Using Bind Mounts
2.4.3 Pros and Cons for Using Bind Mount
2.5 Using tmpfs
3. Logging, Resource Control and Linux Permission
3.1 Logging
3.1.1 Overview
3.1.2 Container Logs
3.1.3 json-file Logging Driver
3.1.4 local Logging Driver
3.1.5 journald Logging Driver
3.1.6 Setting up Default Logging Driver
3.1.7 Exercise for Container Logs
3.2 Resource Control
3.2.1 Overview
3.2.2 Mechanism for Resource Control
3.2.3 Options for CPU Resource Control
3.2.4 Options for Memory Resource Control
3.2.5 Exercise for Resource Control
3.3 About Permission and Linux Namespaces
3.3.1 Overview
3.3.2 How Docker uses Various Types of Linux Namespace
3.3.3 Exercise for Permission and Linux Namespaces
3.3.4 Brief Notes about SELinux
4. Networking
4.1 Overview
4.2 Container Networking and Network Drivers
4.3 bridge Network Driver
4.3.1 Basic Characteristics and Mechanisms
4.3.2 The default bridge Network “bridge”
4.3.3 Creating Custom bridge Network
4.3.4 Publish Ports
4.3.5 Exposed Port
4.3.6 Container Settings for Name Resolution
4.4 host Network Driver
4.5 null Network Driver
4.5.1 Basic Characteristics
4.6 Exercise for Container Networking
4.7 Brief Notes about Firewall Rules Generated by Docker
5. Creating a Custom Image for Your Application
5.1 Create an Image for a Single Application
5.1.1 Use an Intermediate Containers to Create an Image for Your Application
5.1.2 Use Dockerfile to Create Image for Your Application
5.2 Create an Image for Running Two Different Applications
5.2.1 Overview
5.2.2 Problems for Running two Applications in a Container
5.2.3 About Supervisor
5.2.4 Exercise for Using Supervisor
6. Docker Compose
6.1 Overview
6.2 Docker Compose Configuration File
6.2.1 YAML
6.2.2 Top Level Element version
6.2.3 Top Level Element services
6.2.4 Top Level Element volumes
6.2.5 Top Level Element networks
6.3 Docker Compose Command
6.3.1 Commonly Used Child Commands for Starting / Stopping Containers.
6.3.2 Child Commands for Preparing Containers
6.3.3 Child Commands for Maintaining a Project
6.3.4 Child Commands for Maintaining a Specific Service
6.3.5 Child Commands for Maintaining a Specific Container
6.3.6 Child Commands for General Information
6.4 Exercise for Basic Usage of Docker Compose
6.5 Scaling
6.5.1 Overview
6.5.2 Exercise for Scaling
7. Docker Context and Docker API
7.1 Overview
7.2 Accessing a Remote Docker Daemon
7.2.1 Overview
7.2.2 Through the Unix Socket of the Remote Docker Daemon
7.2.3 Configure the Remote Docker Daemon to Listen to a TCP port
7.3 Docker Context
7.3.1 Overview
7.3.2 Exercise for Setting Up / Using a Docker Context
7.4 Docker API
7.4.1 Overview
7.4.2 Exercise for Simple Illustration of Using Docker API
8. Using Docker Swarm Mode
8.1 Overview
8.2 Exercise for Simple Illustration of Using Swarm
8.3 Brief Notes About Deploying a Stack
8.4 Brief Notes about How Routing Mesh Works
8.4.1 Mechanism of Load Balancing for External Networks
8.4.2 Mechanism of Load Balancing within a Custom Overlay Network
Appendix 1 : Basic Installation and Setup
- Installing VMware Workstation Player
- Installing CentOS (Using CentOS Stream 9 as example)
- Installing / Setup SSH Tools
- Putty
- Nano
- WinSCP
- Installing Docker
- Create another VM by Cloning (Optional)
- About Assigning a Static IP Addresss (Optional)
- Cleaning Up after Finishing Exercises in Each Chapter (Optional)
Appendix 2 : Brief Notes about Image ID, Diff ID, Chain ID and Cache ID
Appendix 3 : docker-squash
- Installing python-squash
- Preparing an Image for Squashing
- Squashing the Image